Showing posts with label basic. Show all posts

Monday, 28 January 2013

Updated: everyday eyes!

Good day to all!


I want to share my updated eye makeup rutine. It is based on Essence cream eyeshadow in a shade "09 For Fairies". I've seen girls wear similar shades in summer (I think Chanel's "Emerveille" looks similar). Since it has golden shimmer in it, it looks beautiful once your eyes "catch the sunlight". Although it is a cold and snowy winter out here, it is still suitable for an everyday look. It is simple and fast which makes it perfect in morning getting ready for school, university, work, etc. 


One more thing: Essence claim that these are long lasting eyeshadows and shouldn't "move" or crease during the day. I have tried a few of their shades (next post is coming up) and for me, it depends on a shade. This pink one stays pretty well on, but I feel that people with oily eyelids should use a primer or set it with eyeshadow on top. Also, the pigmentation depends on the amount of the product: the more you use, the more pigmented it will be.
More information about the product can be found at http://www.essence.eu


Friday, 30 November 2012

TIPS: close set eyes!

Ciao!

As I was doing my makeup today (which I decided to do very simply) it occurred to me that this eyelook actually suits me pretty well, especially because I think my eyes are a bit too closely set, and what I did made them look more further away from eacher, hence my face looks more proportional.

SO I decided to share my tips for close set eyes!

What's to be done is to elongate the eyes, cheating, to be exact!

Tip Nr. 1 - Eyeliner :  I don't want to draw attention to the inner corners to my eyes but want to excentuate the length of the eyelid. So when lining your upper eyelid, start at least  at a third inner part away, I start at about the middle  and the further the thicker the line should be , but not too thick. Wing it out a little bit, and your eyes already should look wider set apart!

Tip Nr. 2 - Mascara :  When applying mascara to the lashes, brush them to the outer side of the eye accenting the outer part!

Tip Nr. 3 - Highlight : If you are highlighting the inner tear duct, avoid the most inner part of the eye. I like to highlight first third of the inner part of lower lashline. This will help to drag the attention away from most inner parts.


So these are my 3 tips for widening the space between eyes. They really do come handy for me, hope it will help someone too!

Cheers!

Friday, 13 July 2012

Go casual with purple!

Hi there!

How often do you use a pop of colour on your eyes? Today is one of those days for me. I chose purple     for todays look because it's really nice and subtle (of course, depends on application!). 

What are the main products for todays look?

So as you can see, today I chose to work with a plumy purple eye pencil. 

Step 1: Let's begin with clean prepared eyes! Apply your foundation/concealer to brighten and even out  your complexion around eyes. Put a neutral eyeshadow all over your eyelid. Is can be a slightly shimmery one as well!
Step 2: Taking plum/purple eye pencil, line your upper lash line from the middle. It doesn't have to be neat. Just make sure that it gets thicker in the end and don't be affraid to put more product on!


Step 3: At this point we are going to smoke out the line we just made. For this I used a small medium density brush. You can also you a cotton swab. Blend it more to the outer part of the eye.
Step 4: Now, tip! when it comes to a smoky look and blending, it's easier to layer colours putting and bleding a bit at a time to avoid making a mess.
So now, line your eyes again and repeat the same process blending it away. Whilst blending, feel free to bring the color to your crease area and remember to keep the colour mostly in the outer part of the eye.

Step 5: Complex step! 1) highlight under your brows and in the inner corners of your eyes (it's optional, of course, but makes your eyes brighter), 2) line your upper lash line; I'm using a felt tip eyeliner - very easy to use, great for beginners :) and 3) apply mascara on both upper and lower lashes and...
... your eyes are done! 

This is a really easy and quite way to wear your eye makeup on those days when you feel like getting a bit more colourful!

Oh, and for the sake of my curiosity I went ahead and photoshopped the final look photo with different eye colour just to see how purple compliments each one. 

I personally think that a bit of purple is complimenting each one of them! What do you think? :)

Cheers and have fun! 

Miss K.

Thursday, 12 July 2012

Creative eyeliner: lash illusion!

Hello hello!


I am back today with another simple eye look. This time I decided to get a bit creative and incorporate liner into creating an illusion of fuller lashes


Basically with this method you are "drawing false lashes" on the outer part of your eyelid. This adds fullness and also looks very cute! 


SO let's get on with the steps and I'll explain everything and share some tips! Yey! :)


Step 1: Let's prepare our eyes for the look we are about to do. Use foundation or concealer to cover any redness there is around your eye area and also even out the skin tone. I wanted this look to be a version of a simple cat eye, so we want our eyes plain and matt. Use powder or a skin-toned eye shadow to set the foundation.

Step 2: Using felt tip eyeliner, line your upper lash line. I suggest to start from the middle of your eye and keep the line as close to the lash line AND keep it thin. Then end the line with a flick but keep it thin as well. The important part is to keep any line you make thin!
p.s. whilst lining, fill in noticeable gaps in between you lashes with light dots.


Step 3: This step will help you mark where you want your "falsies" to be. I am using my felt tip eyeliner for this. You can also use sharp eye pencil. Choose how many of those fake lashes you want (I  like making 3!). You will already have one, the furthest one, from lining your eye. So now we need 2 more. Gently mark the "roots" of your new lashes. You can put dots. At this point whilst we are still only marking I wouldn't suggest creating the whole lash because you may not achieve a thin elegant flick with an eye pencil or felt tip liner. 


Step 4: Let's finish those falsies! Take your liquid eye liner which makes pretty thin lines and starting from the tip of the false lash, draw it on and most importantly make sure that every lash you create comes out of the lash line naturally
p.s. to make a fine line make sure you have only a little of the product on your liner tip!


Step 5: Finish of your eyes with mascara. At this point I might say that sometimes I find it pretty when I don't apply mascara on my bottom lashes, it let's you concentrate more on the upper lashes. 
Tip! To exaggerate the outer part of the eye even more, try to 'sweep' your lashes to the side. This also gives your eyes more length AND! this is also helpful for those who have quite short lashes.
p.s. apply a  light shimmery eyeshadow under your brow and in the inner corner for extra cuteness!:)


And your eyes are ready! I really love this and it's a very easy way to add some "falsies" for an extra emphasis! 


I hope you find this trick helpful. Be creative and have a lovely day!


Miss K.

Wednesday, 11 July 2012

Todays eye: Simple everyday eye look!

Hello everybody!

I am very excited to finally post my first eye makeup tutorial!

This is a simple eye makeup that could be used for everyday. Every step will be depicted in a photo and described. 
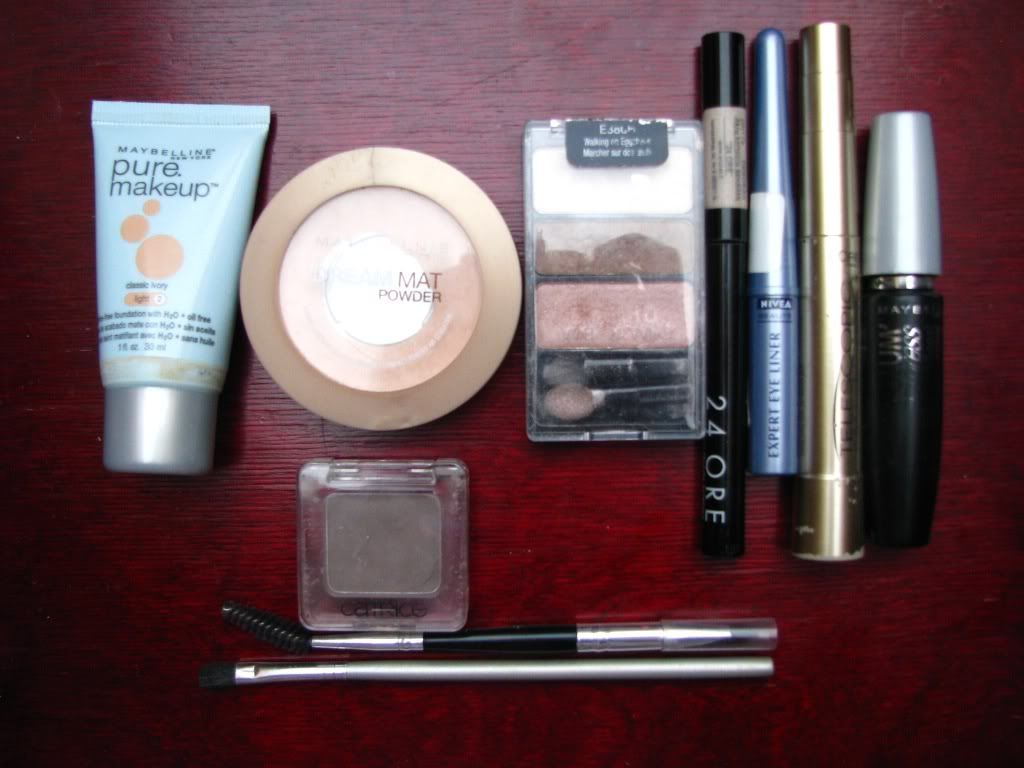
The products that I used for this look can be easily substituted but I will list most of what I used:

  • Maybelline Pure makeup shine-free foundation - since I don't use concealer, I use my foundation to even out the skin tone around my eyes;
  • Maybelline DreamMat powder - for setting the foundation;
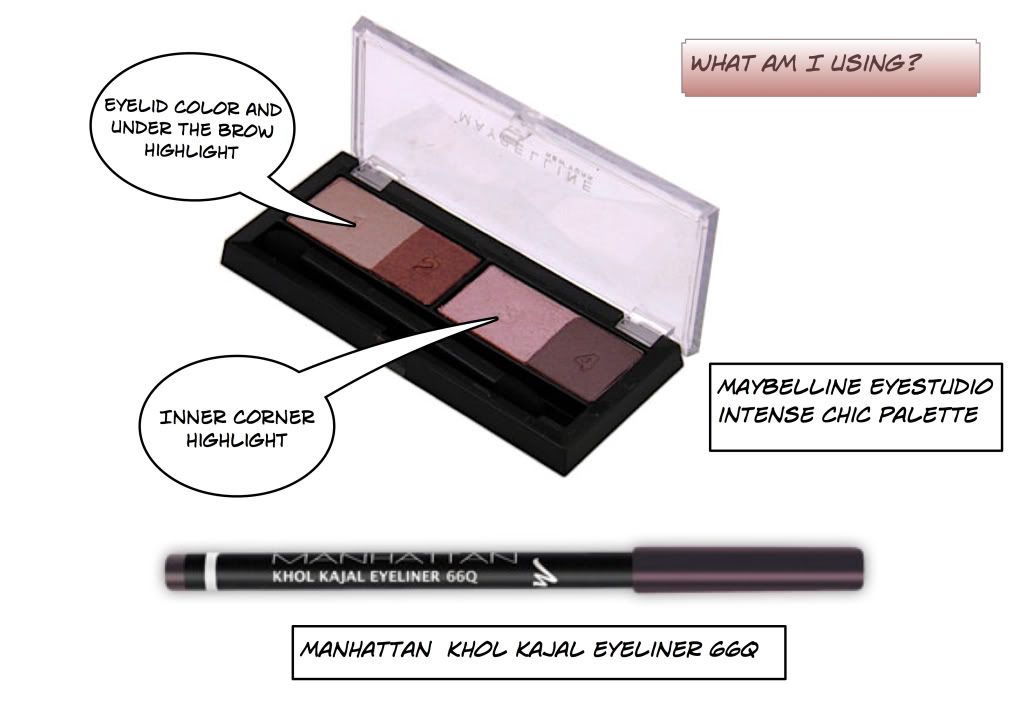
  • Wet'n Wild eyeshadow pallete in "Walking on Eggshells";
  • Deborah felt tip eyeliner "24 ORE";
  • Nivea expert eye liner - liquid eyeliner;
  • Loreal Telescopic mascara in black;
  • Maybelline Volum express waterproof mascara.


Now let's proceed to the tutorial!

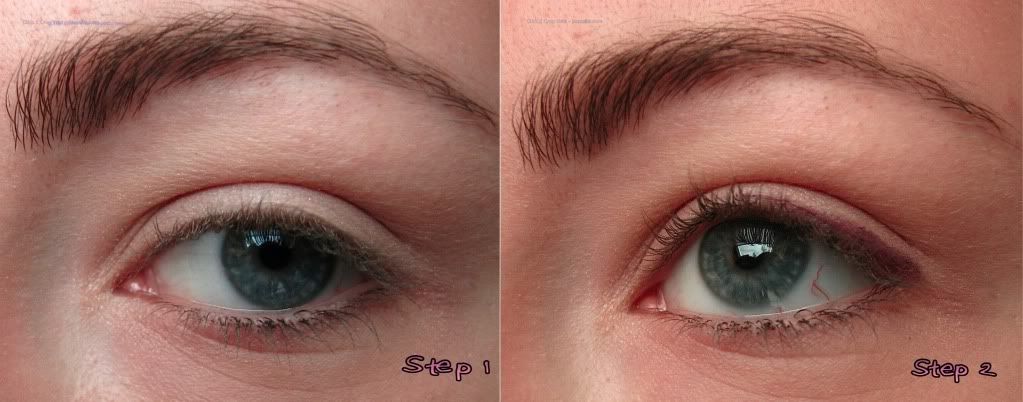
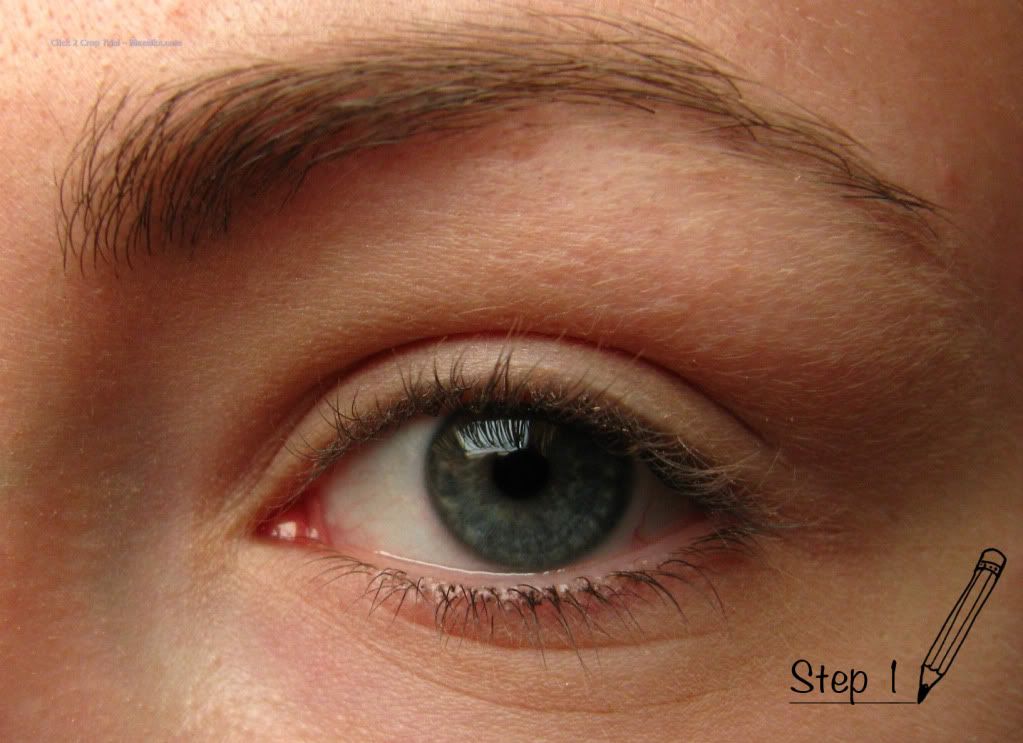
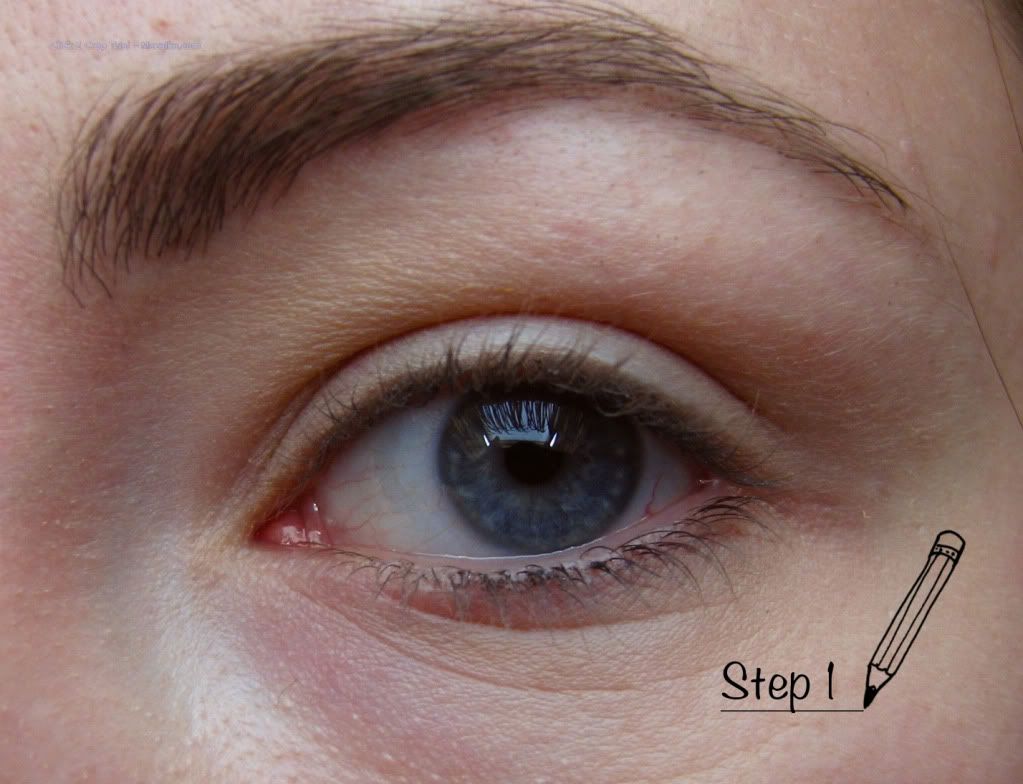
Step 1: I have applied my foundation also putting it around my eyes and on my eyelids to brighten up my skin tone and make me look more awake and fresh. Also I have my eyebrows filled in with eyeshadow.


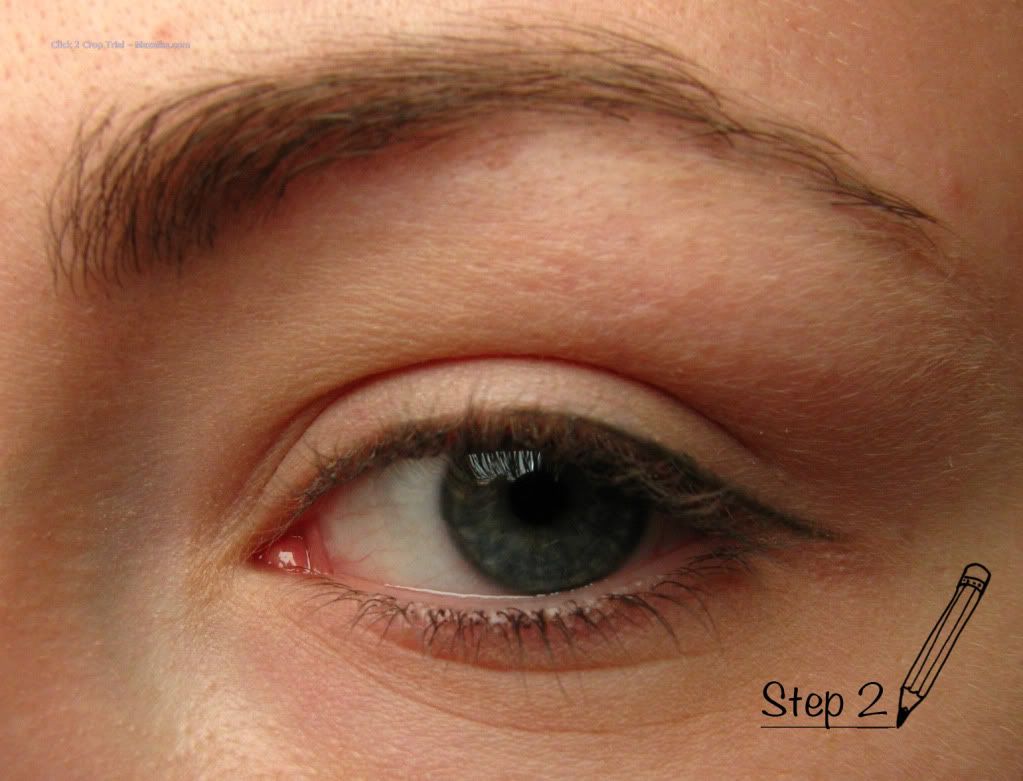
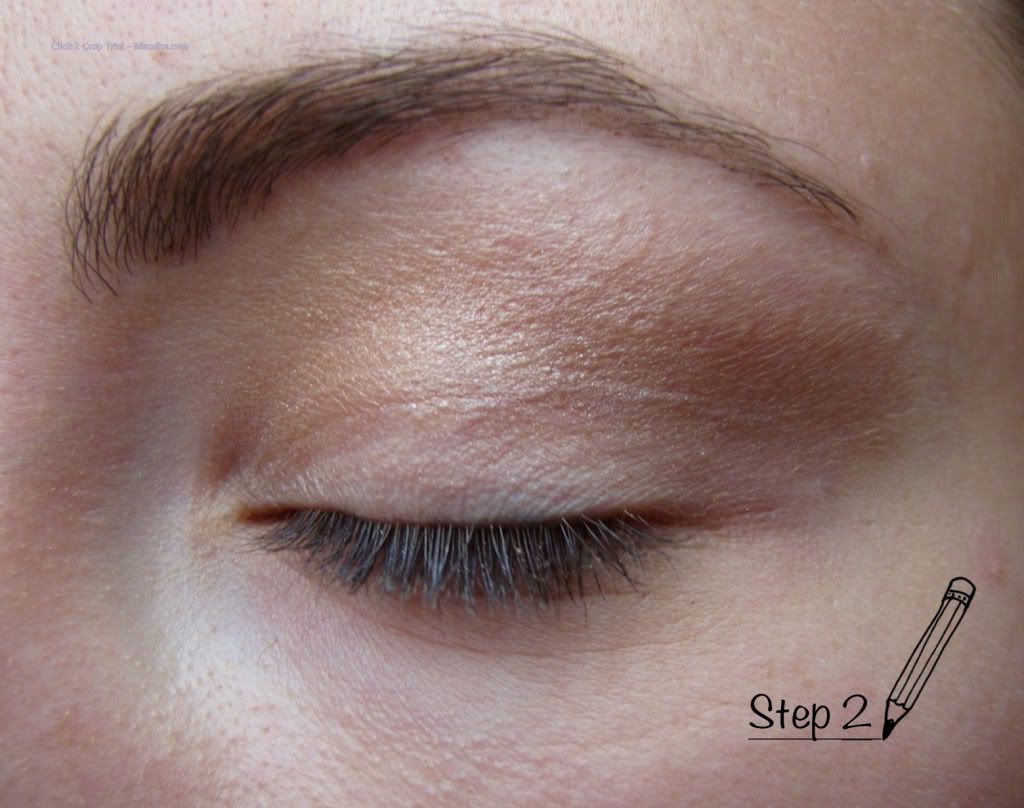
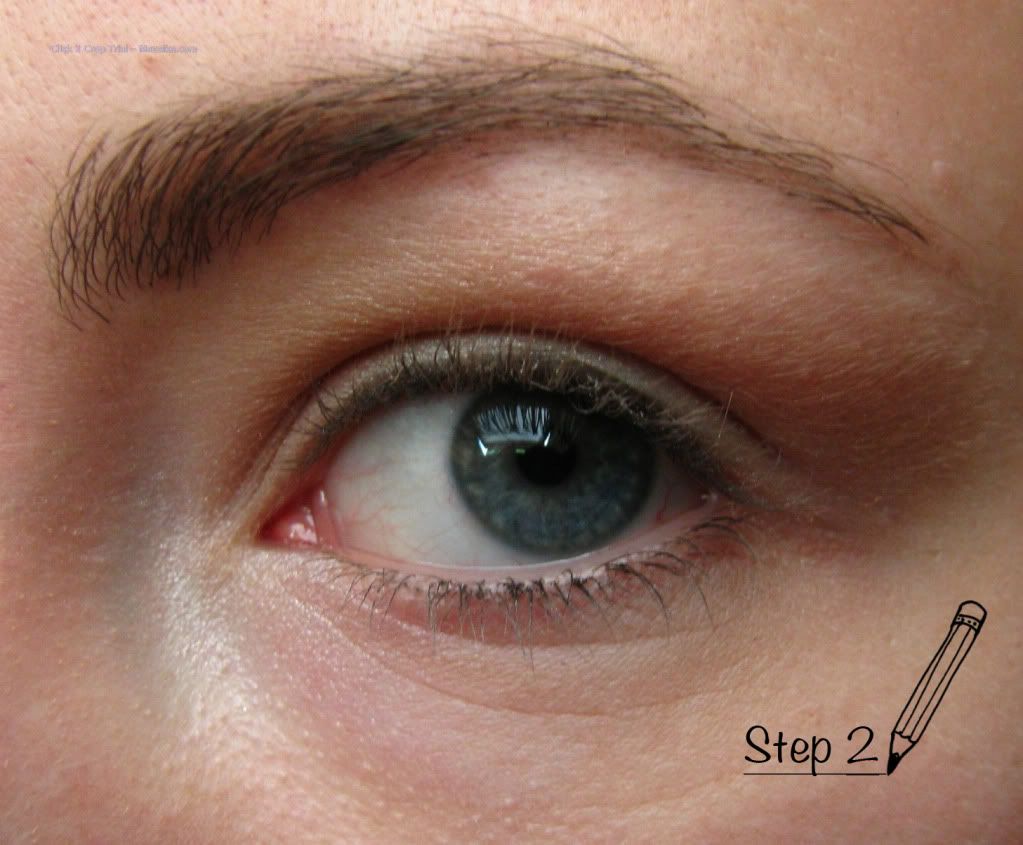
Step 2: Now I start working with eyeshadows. Before this you might want to apply an eyeshadow base in case you have oily eyelids and it would help your eye makeup (all that hard work!) stay on for longer and not smudge as much. 
With a flufy blending brush I took the peachy rose colour from the pallete listed above and placed it in my crease and above avoiding the eyelid. Concentrate mostly on the outter part, this will give you a nice enlongened eye effect. Using the brush, I blended edges esspecially above the crease. 


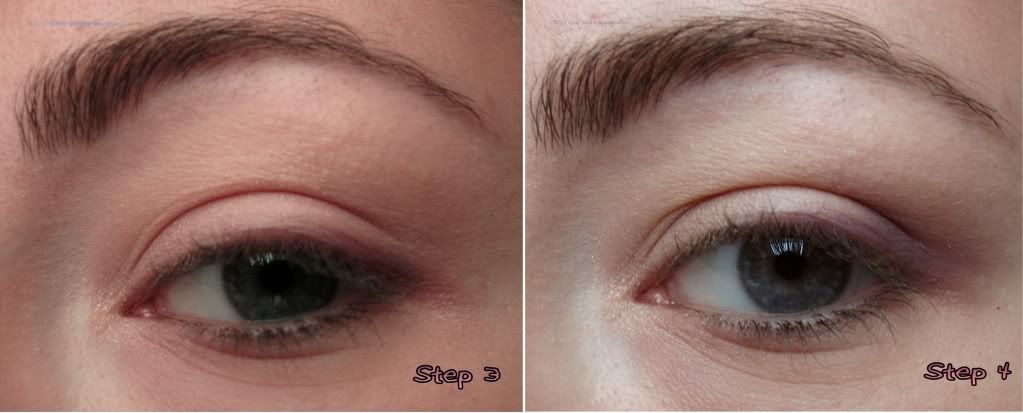
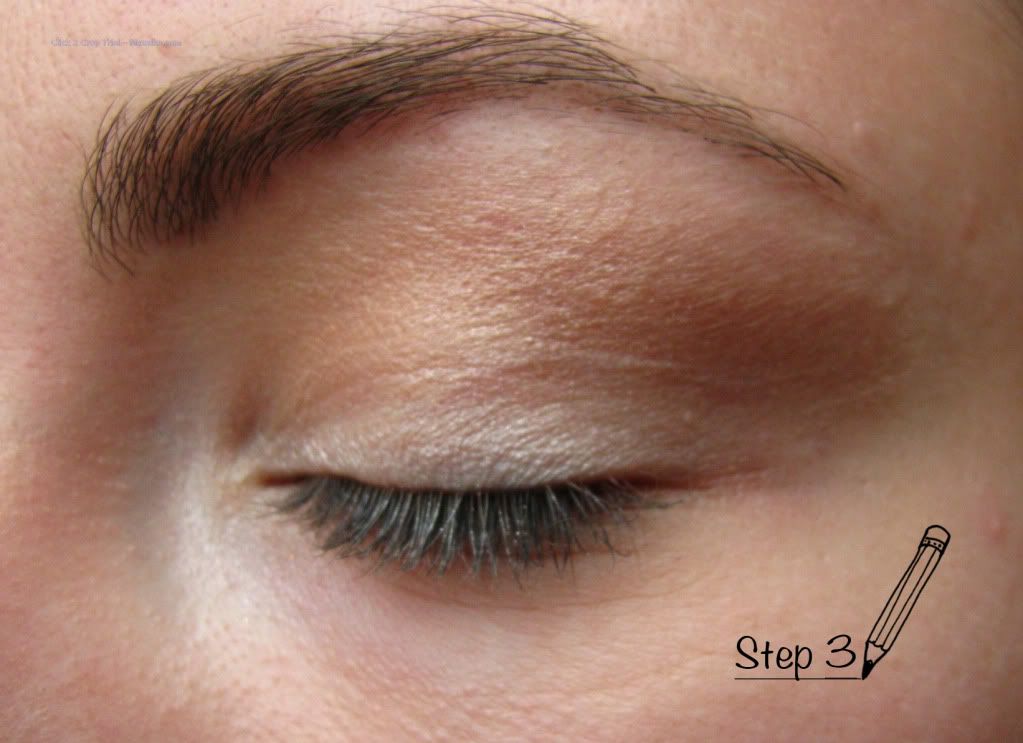
Step 3: Now taking the light shimmery colour form the pallete you want to place it on the center of your lid and in the inner corrner of your eye. I do this using my finger since I'm not a huge brush user.

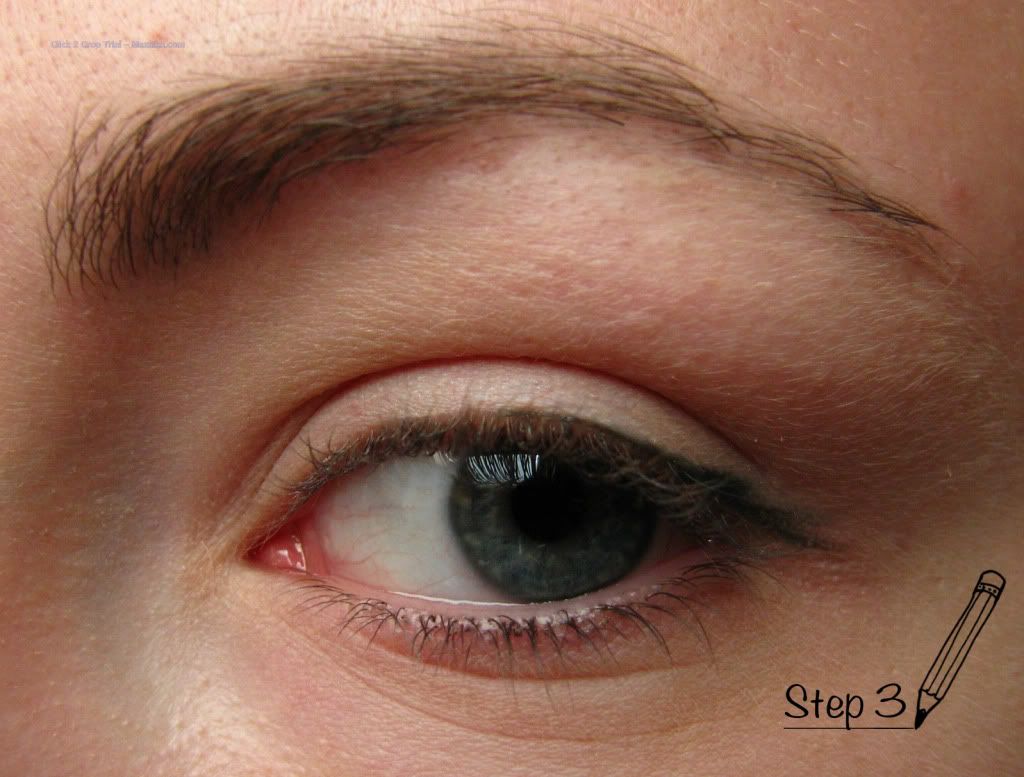
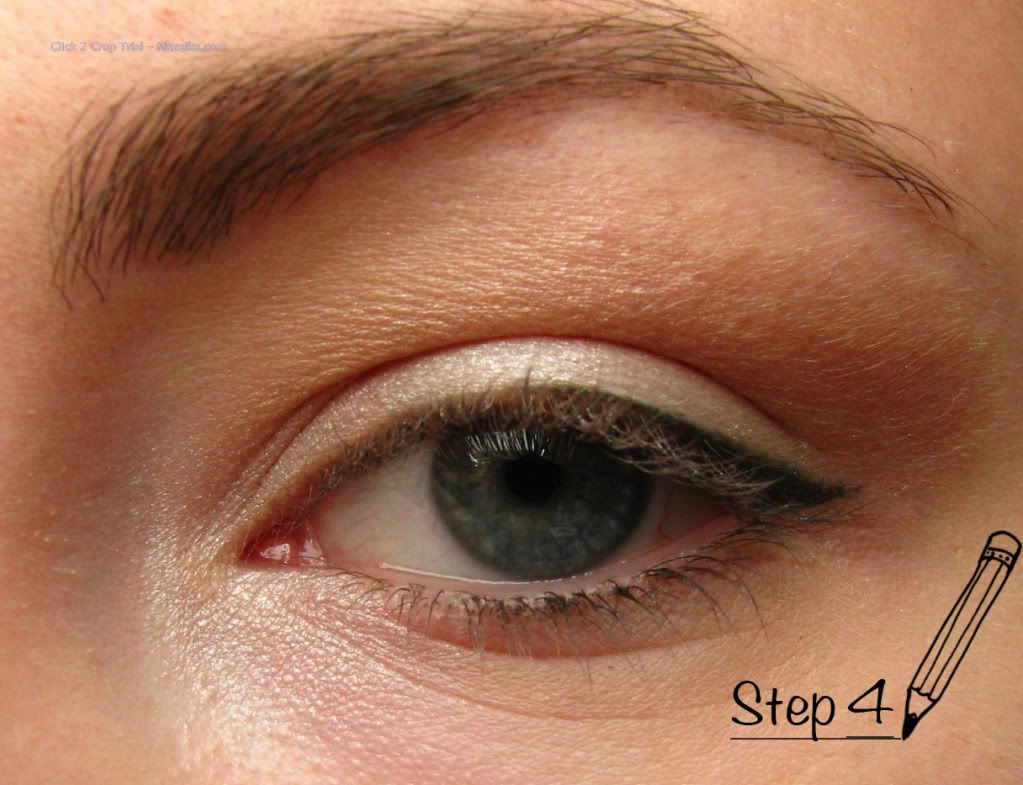
Step 4: Finally the fun but tricky part - eyeliner. I am using a felt tip eyeliner and starting form the center of my eye I draw a fine line as close to my lash line as possible; the line starts as fine and continues to get a bit thicker as it goes out. 
Now, one important thing to have in mind during this step is that a line starting from the middle of your eye should be fine in the beginning to create an illusion that it is continuing your natural eye shape. You don't want to draw an unnatural looking line, you want it to enhance you eye shape (in other words I could call it your "upper lid curve").
Finally to finish the line, create a tiny flick in the end to give your eye some extra length. Since this is an everyday look for daytime, you don't want it to be too dramatical. Make it tiny and cute!

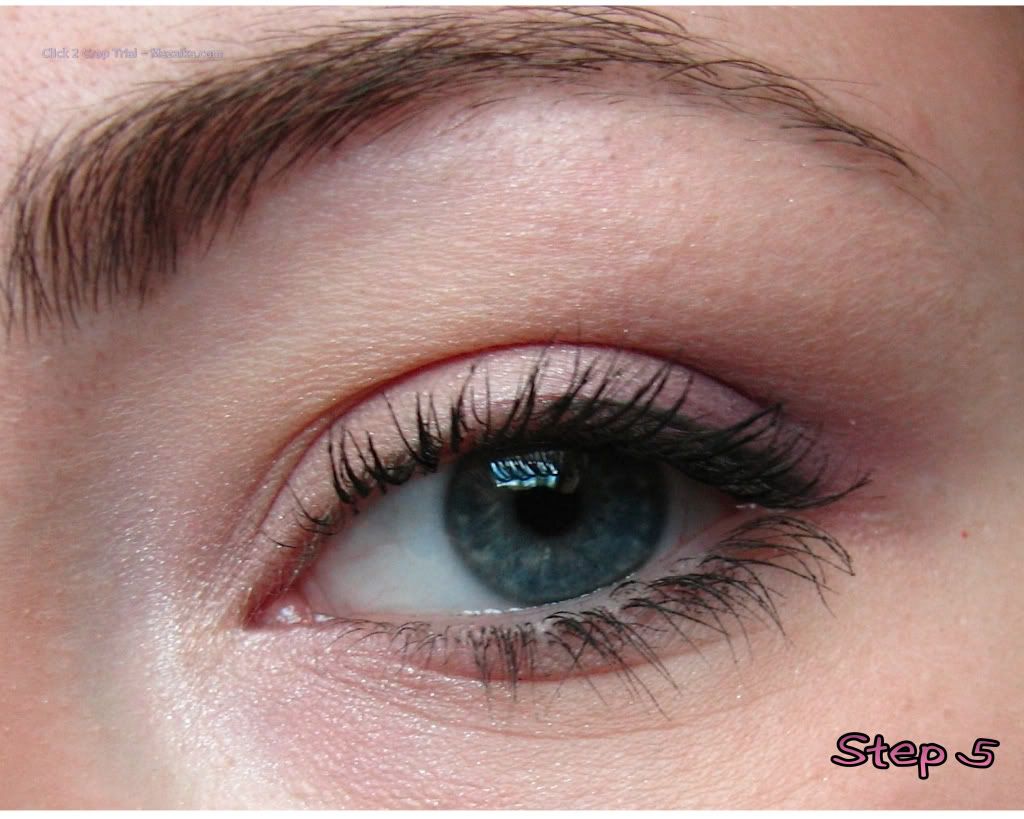
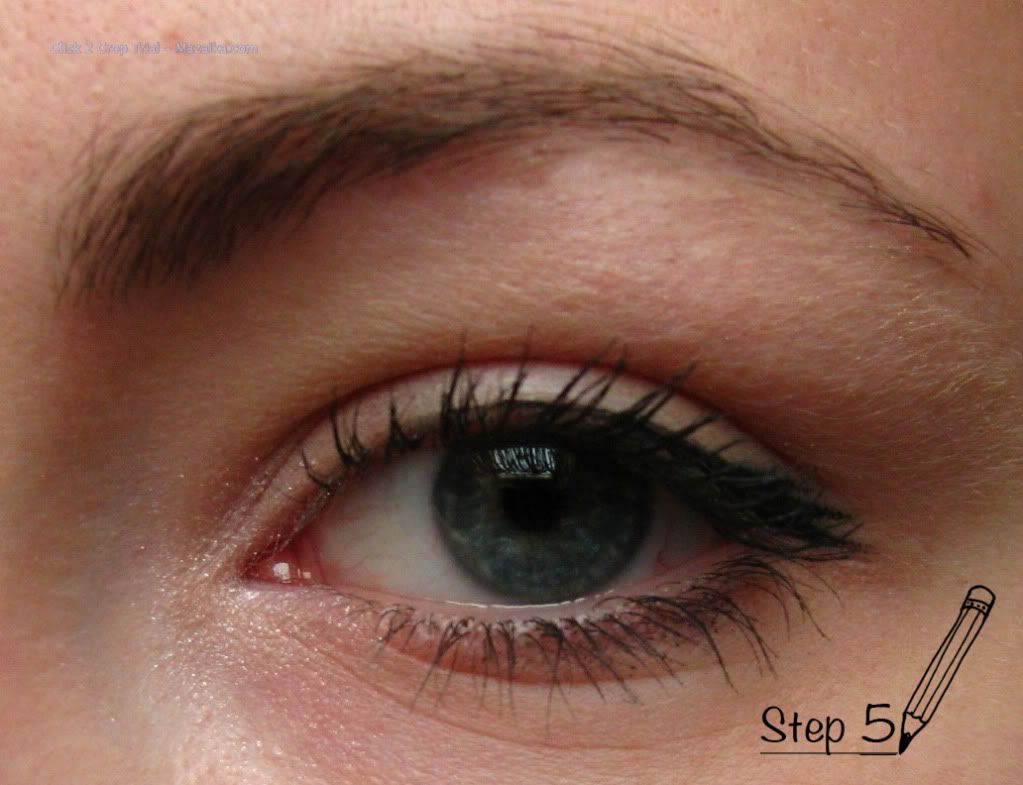
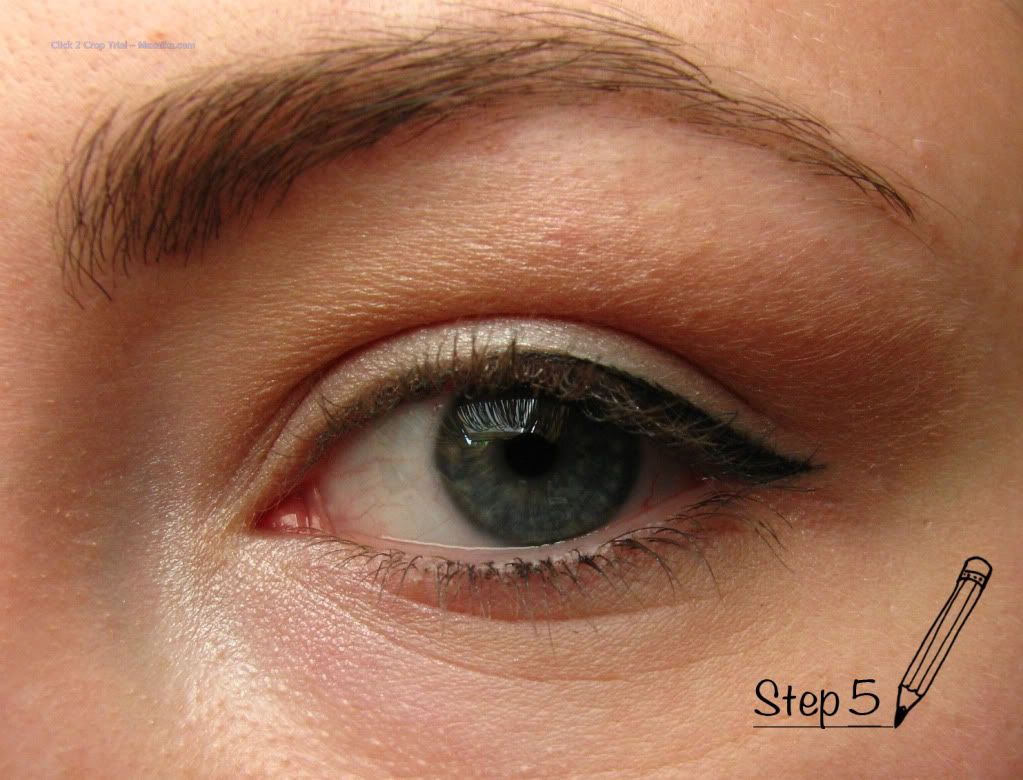
Step 5: This step is optional. In the steo before I used a felt tip eyeliner which is supposed to be quite intensive and longlasting. It was like that in when I bought t a few months ago. Now it looks wuite soft on the eye - I'd say quite perfect for this look! But since my eyes tend to get quite watery if let's say it's windy outside, my eye makeup in the outter corner tends to smudge. To prevent that I used my liquid eyeliner and painted it over the line I made. This intensifies the line and helps it stay longer! 
p.s. You could also say that I used the felt tip as a guid for my liquid liner !

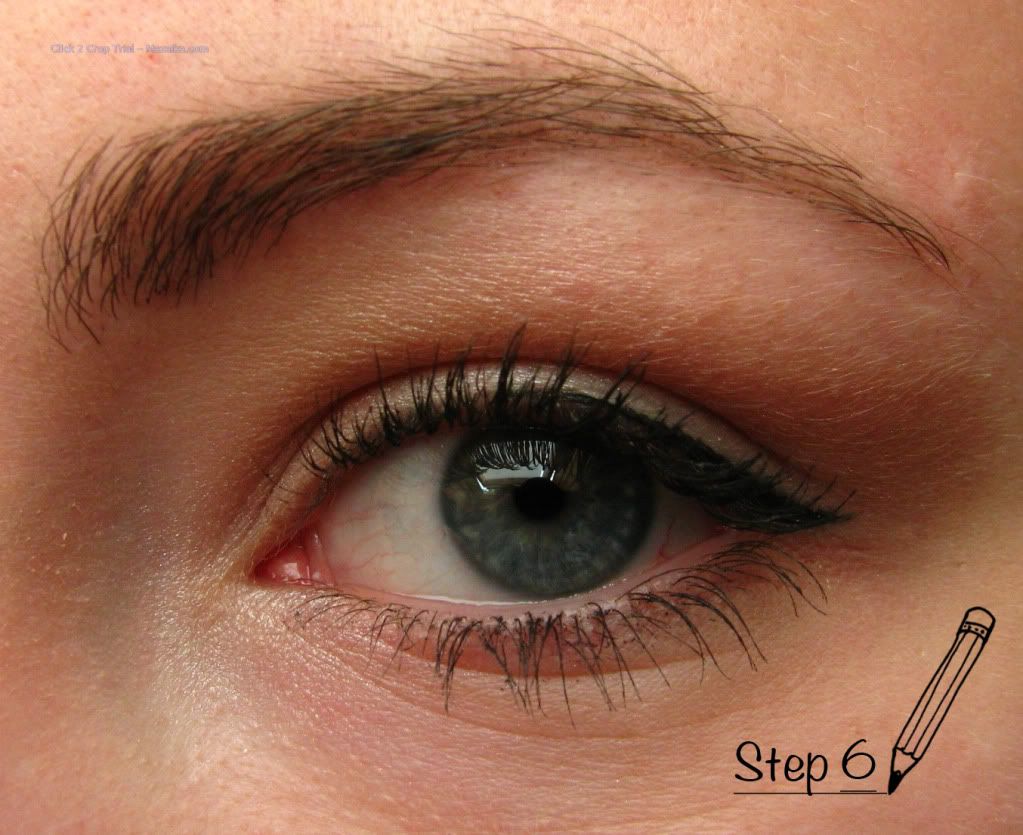
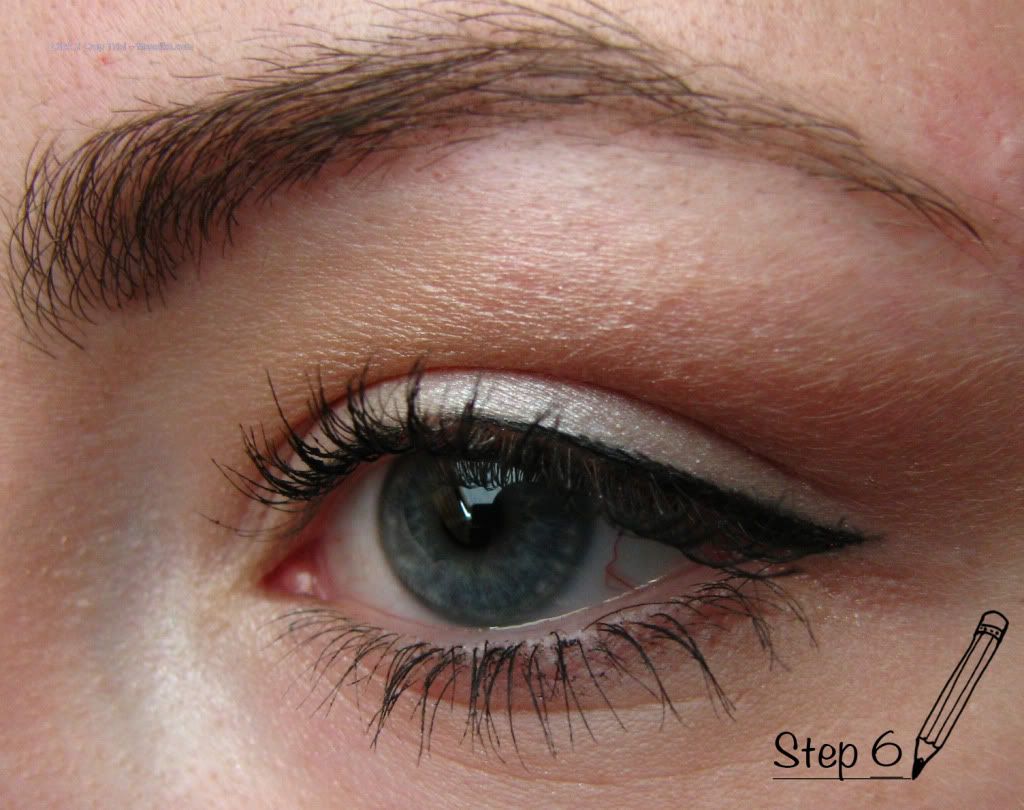
Step 6: Last step! Apply mascara on both upper and lower lashes. Concentrate on the outter part to lengthen the eye. I use waterproof mascara on my lower lashes because during the day it tends to smudge a bit.


And you're eye makeup is ready! 

Don't forget to smile and have a lovely day!

Yours,
Miss K.